Using this face of Bumpy, first make corrections to this shot I will submit to the SuperCool Film Maker website. Make recommendations to improve the shot for the AI generator on SuperCool Film Maker. Create three images based on this shot. Estimate the duration of the shot in seconds.
For the Shot 2, which camera, setting lighting, and genre should I use?
The Core Prompt Structure
To achieve cinematic results, structure your AI shot prompt by combining five essential elements in this exact order:
Shot Type & Camera Angle: Establish the frame right away (e.g.,
Wide master shot,Extreme close-up,Low-angle tracking shot).Subject & Action: Describe who or what is in the frame and exactly what they are doing using active verbs (e.g.,
A weathered traveler walking through a neon-lit alleyway).Environment & Setting: Define the location, texture, and time of day (e.g.,
Damp brick walls, puddles reflecting light, cyberpunk city, night, photorealistic).Lighting & Atmosphere: Direct the mood (e.g.,
Volumetric lighting, cinematic haze, high-contrast chiaroscuro, golden hour).Camera Motion (Crucial for Video AI): Explicitly state how the camera moves (e.g.,
Slow push-in, subtle pan right, stationary camera with high subject motion).
Pro-Tips for AI Filmmaking Control
Think in Shots, Not Scenes: Do not try to prompt an entire narrative sequence at once. Break your scene into distinct 3-to-5-second individual shots (e.g., a wide establishing shot, a medium reaction shot, and a tight insert shot). You can stitch and trim these clips aggressively in your editing software later. [1]
Control Motion with Keywords: Avoid words like "beautifully" or "dramatically"—AI doesn't understand abstract quality modifiers. Instead, use practical camera cues like
slow pan,tilt up,dolly zoom, orcrane shot.Use "Image-to-Video" for Continuity: Text-to-video engines often produce chaotic layouts. For maximum control, first use a high-quality image generator (like Midjourney or Flux) to lock down the exact composition, setting, and character look. Then, feed that static "hero image" into your AI video generator along with a motion prompt (e.g.,
maintain consistency, slow zoom into the character) to bring it to life. [1, 2, 3]
1. Foundational Traveling Moves (Physical Camera Relocation)
These terms instruct the AI to physically transport the camera body through three-dimensional space. [1, 2]
Dolly In: Move the camera physically toward the subject to intensify emotion.
Dolly Out: Move the camera physically backward away from the subject to reveal context.
Push In: A forceful forward physical camera movement to heighten tension.
Pull Back: Physical backward movement to emphasize isolation or scale.
Tracking Shot: Smoothly glide alongside a subject, maintaining a consistent distance.
Truck Left: Lateral physical camera movement traveling toward the left flank.
Truck Right: Lateral physical camera movement traveling toward the right flank.
Follow Shot: Position the camera behind a subject, physically following their trajectory.
Leading Shot: Position the camera in front of a subject, physically backing away as they advance.
Arc Shot: Revolve physically around a subject in a semi-circular path.
Orbit Shot: Complete a full 360-degree physical rotation encircling a subject.
Lateral Track: Sideways tracking movement perfectly parallel to the action sequence.
Crabbing: Side-to-side physical shifting, often used in restricted or tight environments.
Parallel Tracking: Running alongside a vehicle or runner at an identical speed velocity.
Converging Track: Tracking shot that gradually moves closer to the subject on an angle.
Diverging Track: Tracking shot that gradually veers away from the subject on an angle. [1, 2, 3, 4, 5, 6, 7]
2. Rotational & Axis Pivoting (Fixed Base Movements)
These commands instruct the AI to rotate or tilt the camera from a fixed, stationary point. [1, 2]
Pan Left: Swivel the camera horizontally from right to left.
Pan Right: Swivel the camera horizontally from left to right.
Tilt Up: Pivot the camera vertically upward to emphasize height or grandeur.
Tilt Down: Pivot the camera vertically downward to establish a sense of perspective.
Whip Pan: An ultra-fast, blurry horizontal swivel used for rapid transitions.
Swish Pan: A high-speed rotational blur separating two distinct focal scenes.
Snap Pan: An abrupt, sudden horizontal camera jerk targeting a new action point.
Tilt Reveal: Start facing a neutral surface and slowly tilt to unveil a subject.
Roll / Horizon Roll: Spin the camera on its Z-axis, rotating the horizon line.
Dutch Tilt: Mount the camera at a skewed, slanted angle to signal psychological unease.
Canted Angle: Fix the horizon at a sharp diagonal incline to build static tension.
Panorama Swivel: A wide, slow, sweeps-based rotation mapping out massive scenic horizons. [1, 2, 3, 4, 5, 6, 7]
3. Vertical Space, Elevation & Cranes
Use these terms to take advantage of the vertical Y-axis, leveraging cranes, jibs, and mechanical heights. [1, 2]
Crane Up: Elevate the entire camera body vertically high into the air.
Crane Down: Lower the entire camera body vertically toward ground level.
Jib Up: A smooth vertical arc lifting movement capturing sweeping reveals.
Jib Down: A smooth vertical arc lowering movement landing squarely on a subject.
Pedestal Up: Elevate the camera straight up vertically without changing the lens tilt.
Pedestal Down: Lower the camera straight down vertically while keeping the lens parallel.
Boom Up: Mechanical vertical lift typically used to clear foreground obstructions.
Boom Down: Mechanical vertical descent dropping into an unfolding sequence.
Plunge Shot: Drop the camera straight down visually, mimicking a sheer cliff descent.
Ascending Reveal: Travel straight up into the air to reveal a hidden landscape feature.
Descending Reveal: Travel straight down from above to unmask a localized subject. [1, 2, 3, 4]
4. Drone, Aerial & Flight Simulation
These high-altitude prompts generate expansive, sweeping cinematic visuals from an unattached aerial perspective. [1, 2]
Drone Shot: Generic unattached aerial camera flight mapping out geographic areas.
Bird’s-Eye View: Position the camera directly overhead pointing completely straight down.
God’s-Eye View: Extreme high-altitude overhead shot mapping an entire layout from above.
Top-Down Perspective: Completely flat overhead view perfectly perpendicular to the ground.
FPV Drone Dive: A fast, aggressive, swooping aerial dive weaving through tight spaces.
Aerial Sweep: High-altitude wide-angle sweeping glide across open environments.
Flyover: Simulate a forward-moving airplane or high-speed drone traversing a city.
Banked Turn: An aerial flight curve where the camera tilts sharply into the turn direction.
Helicopter Shot: High-altitude, slightly vibrational, far-distance sweeping capture.
Low-Altitude Glide: Skim the camera incredibly low to the ground or water surface at high speed. [1, 2]
5. Camera Rigs, Stabilization & Stylization
These terms alter the physical "handling" of the camera, impacting the steadiness, grit, or immersion of the footage. [1, 2]
Steadicam: Immersive, perfectly smooth, fluid movement that glides effortlessly.
Handheld: Introduce a subtle, organic human hand shake to ground the realism.
Gimbal Stabilized: Mechanically isolated motion eliminating harsh organic bumps.
Tripod Locked-Off: Perfectly static frame where absolutely nothing moves except the subject.
Snorricam: Rig attached directly to the actor; the body is static while the background warps.
Body-Cam: Rig fixed to a chest or helmet providing raw, visceral first-person perspectives.
Dash-Cam: Static, hard-mounted vehicle perspective peering through a front windshield.
Documentary Shake: Intentional, unscripted jerky re-centering to emulate raw news footage.
Found Footage Style: Low-fidelity, highly chaotic handheld look simulating consumer cameras.
Crash Cam: High-velocity camera impact motion that abruptly stops right at a collision point.
Cable Cam: Linear, perfectly level high-wire sliding motion gliding over a crowd or stadium. [1, 2, 3, 4, 5]
6. Lens Adjustments & Focal Manipulations
These terms adjust the optics within the lens itself, leaving the physical camera base stationary. [1, 2]
Zoom In: Narrow the focal length to bring distant subjects closer instantly.
Zoom Out: Widen the focal length to expand the visual field and shrink subjects.
Crash Zoom: A violent, lightning-fast kinetic zoom used for dramatic shock or emphasis.
Snap Zoom: A sudden, instantaneous optical jump directly into an object.
Dolly Zoom: Move the camera backward while zooming in, creating a disorienting warp.
Vertigo Effect: The signature background compression warp while the subject stays static.
Rack Focus: Shift the focal plane smoothly from a foreground object to a background object.
Pull Focus: Intentionally defocus the lens away from a subject to blur out details.
Shallow Depth of Field: Sharply focus on the subject while transforming the background into bokeh.
Deep Focus: Maintain crisp, sharp clarity across both the immediate foreground and distant background.
Macro Zoom: Deep optical magnification focusing strictly on microscopic or tiny details.
Defocus Transition: Completely blur out the camera lens to smoothly bridge two distinct scenes. [1, 2, 3, 4, 5, 6, 7, 8]
7. Framing Dimensions & Proximity Scales
These commands define how much of your subject and environment occupies the screen area. [1, 2]
Extreme Close-Up (ECU): Focus exclusively on minute features like an eye or a ticking watch.
Close-Up (CU): Tight framing containing only the head and neck of a character.
Medium Close-Up (MCU): Frame the character cleanly from the chest or shoulders upward.
Medium Shot (MS): Classic waist-up human framing balancing character and immediate environment.
Medium Wide Shot: Frame the character from the knees up, expanding spatial context.
Full Body Shot: Capture the character in their entirety from head to toe.
Wide Shot (WS): Prioritize the environment, making the human subject small inside the frame.
Extreme Wide Shot (EWS): Dominate the frame with vast scenery; characters become tiny specs.
Establishing Shot: Wide panoramic framing explicitly identifying a scene's geography.
Choker Shot: Aggressive close-up slicing off just below the chin and right above the eyebrows. [1, 2, 3, 4]
8. Kinetic Speeds, Timing & Physics Controls
Control the temporal pacing and velocity of how the camera registers time and motion. [1, 2]
Slow-Motion (Slow-Mo): Dilate time to stretch fractions of a second into graceful sequences.
High-Speed Capture: Overcrank the frame rate to analyze explosive or hyper-fast actions.
Time-Lapse: Compress hours or days of physical environmental changes into mere seconds.
Hyper-Lapse: A moving time-lapse where the camera physically travels long distances over time.
Speed Ramp: Seamlessly accelerate from slow motion to real-time within a single shot.
Bullet Time: Freeze an action sequence completely while the camera spins around it.
Frozen Orbit: Halt all physical subject movements while the camera orbits smoothly.
Fast Dolly In: Rapidly advance forward toward a face to maximize urgency or shock.
Slow Pan: Silently, gradually glide horizontally to preserve a calm, steady atmosphere.
Sudden Jerk: A sudden, erratic vector shift simulating an explosion or ground impact. [1, 2, 3, 4, 5]
9. Advanced Cinematic Point-of-Views (POV)
These directives dictate the psychological perspective and placement of the camera relative to the scene. [1]
First-Person POV: Position the camera exactly inside the eyes of a character looking out.
Over-the-Shoulder (OTS): Position the camera behind one character's shoulder looking at another.
Low-Angle Shot: Place the camera low looking up to make a character look dominant and powerful.
High-Angle Shot: Place the camera high looking down to make a character look vulnerable.
Eye-Level Shot: Maintain a neutral, human eye line to project objective realism.
Worm’s-Eye View: Place the camera completely flat on the dirt looking straight up from the ground.
Ground-Level Track: Slide the camera right along the floor surface following footsteps or wheels.
Two-Shot: Frame two distinct characters symmetrically within a single, unified composition.
Point-of-View Reveal: Transition from a character's eyes directly out to what they are witnessing.
Through-Object Transition: Pass the camera cleanly through a keyhole, window pane, or wall. [1, 2, 3]
A SINNER KISSED AN ANGEL
PART I: GENESIS
BUMPY COMES HOME A PERFECT GANGSTER
CHAPTER 1: HIDE OUT IN GOD’S SHADOW
SECTION: FALSE HOPE
SHOT 1 — ARRIVAL
SHOT PURPOSE: Introduce Bumpy, Detroit, the freezing weather, and his physical condition.
ESTIMATED DURATION: of this shot is 12 to 14 seconds.
LOCATION: Exterior, Detroit Greyhound Bus Station, Michigan.
TIME: Day — March 27, 2027 at 6:00 p.m.
WEATHER: Freezing, approximately 32°F, gray overcast sky, wet pavement, light steam and exhaust.
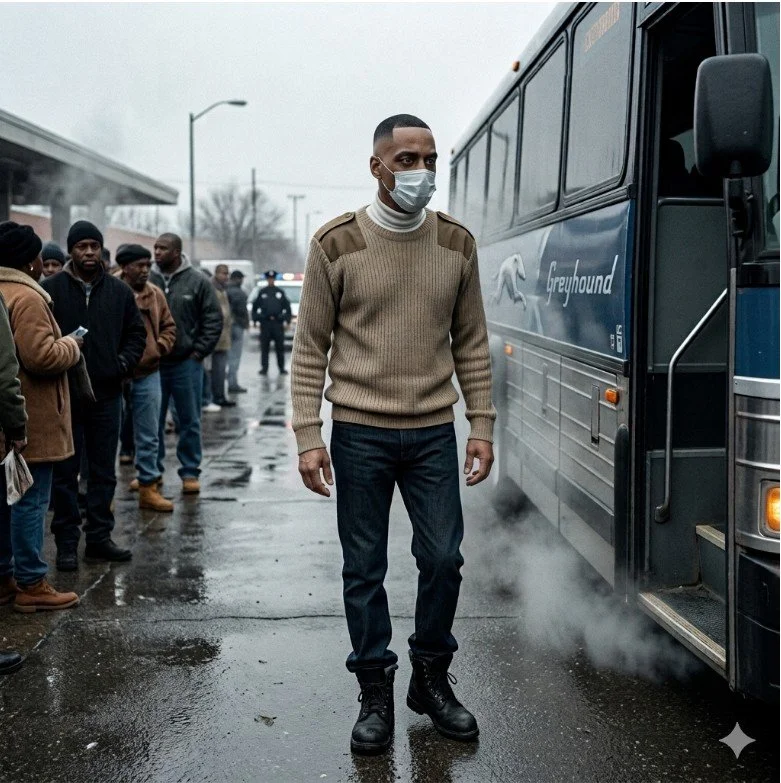
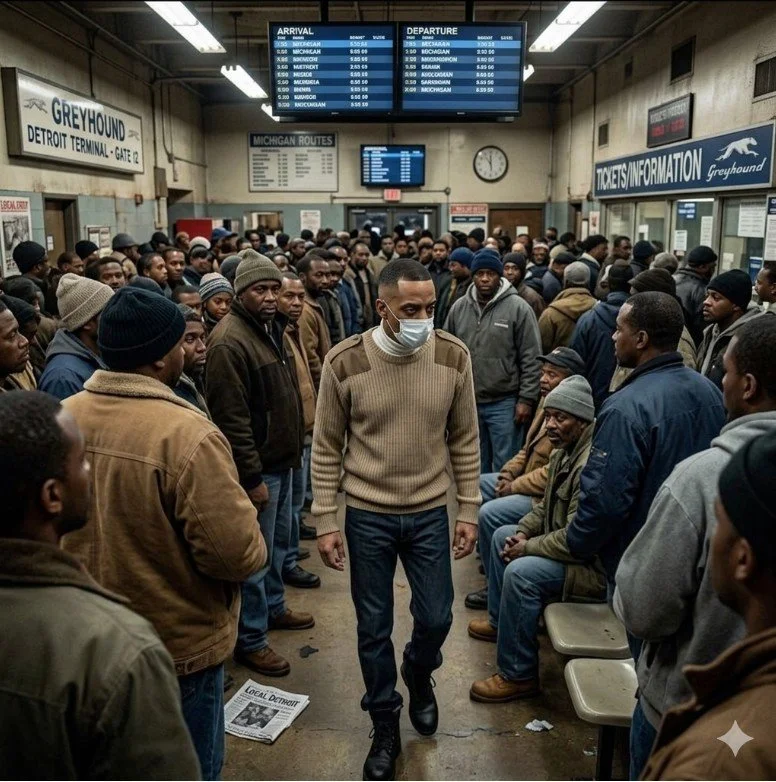
VISUAL: A chaotic Detroit bus terminal on a cold March evening. A Greyhound bus that has arrived from Ottawa sits at the terminal. Steam and exhaust drift through the freezing air. Rain-slicked concrete reflects the gray sky and surrounding lights.
1. CHARACTER IDENTITY — never change this
MARC “BUMPY” DOMINIQUE, 32: Same facial identity as the reference image. Adult Black man with a medium-brown complexion, closely cropped black hair with a tight bald fade, broad forehead, strong straight eyebrows, deep-set dark eyes, defined broad nose, prominent cheekbones, full defined lips, strong square jaw, and distinctive facial proportions matching the reference image. Preserve his facial structure and identity exactly. His expression is wary, hardened, exhausted, and frightened. His face appears slightly hollowed because of a recent forty-pound weight loss.
2. CLOTHING — explicitly override the reference clothing
CLOTHING: Do not reproduce the clothing from the reference photograph. Bumpy wears a beige military-style sweater with brown shoulder patches over a white turtleneck sweater, dark blue jeans, rugged black work boots, a black military watch, and a light blue medical mask covering the lower half of his face. Clothing hangs loosely from his weakened frame.
3. PHYSICAL CONDITION
PHYSICAL CONDITION: Bumpy is 6'1" with a lean, gaunt, weakened frame. He has recently lost approximately forty pounds. His cheeks are slightly hollowed, his eyes have deep dark circles beneath them, and his overall appearance suggests severe physical exhaustion and illness. Do not make him muscular or athletic.
4. SHOT / CINEMATOGRAPHY
SHOT: Exterior Detroit Greyhound Bus Station, March 27, 2027, 6:00 p.m. Freezing 32°F evening, gray overcast sky, wet rain-slicked pavement, light steam and bus exhaust. MARC “BUMPY” DOMINIQUE, 32, steps down from the bus. A medical mask covers the lower half of his face. He looks up and sees a large thunder cloud over the city. He stops at the bottom of the bus steps and looks across the crowded terminal of African American people.. His hardened eyes move rapidly from person to person until he notices a police checkpoint.
Medium cinematic shot following him from the bus, gradually pushing toward his face as he notices the checkpoint. Background crowded terminal of African American people remain naturally active but increasingly soft as attention shifts to Bumpy. His body language communicates fear, exhaustion, and extreme caution.
ARRI Alexa 35, 35mm lens, 24 fps, cinematic lighting, photorealistic, natural skin texture, realistic human proportions, shallow depth of field, desaturated cinematic palette, muted earth tones, dramatic realistic cinematography.
CAMERA: Medium shot following Bumpy as he exits the bus, then slowly pushes toward his face as he notices the checkpoint.
VOICE-OVER — BUMPY:
“I nervously got off the bus, not knowing if the Detroit Police Department would arrest me right there.”
END SHOT: Bumpy staring toward the checkpoint.
Separate Face from Clothing: When using the character reference tool on platform sites, use text tags like [Same facial identity as the reference image: adult Black man with close-cropped black hair, broad forehead, strong eyebrows, deep-set dark eyes, defined nose, full lips, strong square jaw, prominent cheekbones, and a serious, composed expression. Preserve the same facial proportions and distinctive features.] but explicitly describe the new clothes if you want to force the engine to change them. If you want a seamless generation, matching the script clothing to the photo clothing (as done in the optimized script above) yields the highest consistency.
MARC “BUMPY” DOMINIQUE, 32, is 6'1" with a lean, weakened frame. Use the same facial features and physical identity as the character reference image. He has a medium-brown complexion, closely cropped black hair bald-faded hair cut, strong eyebrows, deep-set intense eyes, a broad nose, defined cheekbones, and a strong jaw. His face appears tired and slightly hollowed from a recent forty-pound weight loss. He has a wary, hardened expression. A black medical mask covers the lower half of his face.
Camera Directives: Use explicit technical engine terms like
cinematic lighting,35mm film format, andphoto realisticat the end of your prompt box to stop the AI from generating a soft, video-game-like look.
📹 Camera & Focal Settings
Camera: ARRI Alexa 35 or Sony Venice 2. The Alexa 35 gives an industry-standard cinema texture that handles cold, overcast light beautifully. The Venice 2 is excellent for smooth, filmic dark tones.
Focal (Lens Type): 35mm or 50mm with a Standard lens character. This perfectly handles a "medium shot" that slowly pushes in toward Bumpy's face without distorting his features.
Aperture: f/1.8 or f/2.8. This creates a shallow depth of field, keeping Bumpy crisp while softly blurring out the chaotic background crowd and the bus terminal behind him.
Frame Rate: 24 fps. The traditional, standard cinematic frame rate for narrative filmmaking.
🎨 Visuals & Tone Settings
Lighting: Overcast soft or Low-key dramatic. "Overcast soft" mirrors the 32°F gray March morning described in your script, while "Low-key dramatic" will enhance the tension as he spots the police checkpoint.
Palette: Desaturated cinematic or Muted earth tones. This drains out overly vibrant, happy colors to emphasize his sickly appearance and the bleakness of the freezing Detroit environment.
Genre: Drama or Thriller. This tells the AI engine to prioritize high-stakes facial expressions, serious lighting, and cinematic framing over hyper-stylized action look or flat documentary lighting.
SHOT 2 — THE CHECKPOINT
SHOT PURPOSE: Establish the danger and reveal the Detroit Police Department connection.
VISUAL:
Make it stand out
Whatever it is, the way you tell your story online can make all the difference.
Bumpy's POV.
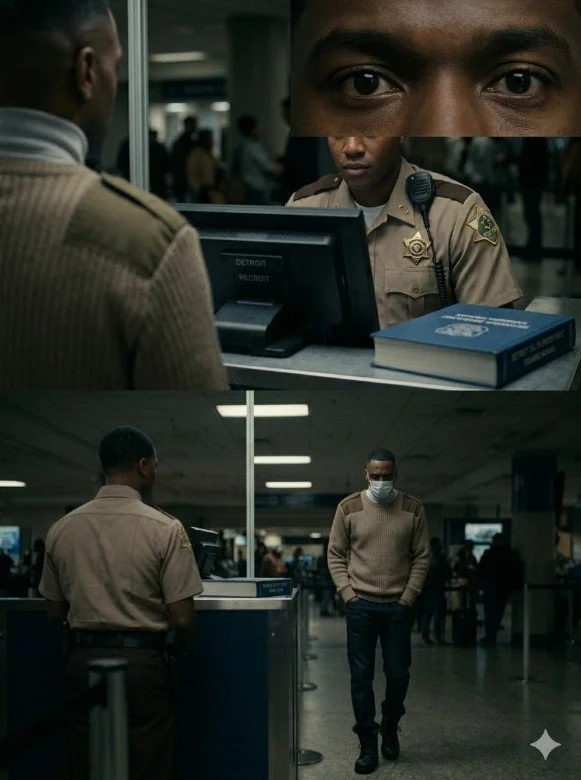
A temporary U.S. Border Patrol checkpoint stands inside the terminal.
Behind the counter is AGENT WILLIAMS, a tall young Black medium complexion man in his early twenties. He has a clean-faded hair and wears a crisp tan-and-brown customs uniform with a gold star badge.
Williams sits behind a digital terminal, completely focused on the screen.
Beside the terminal is a thick blue book.
The spine clearly reads:
DETROIT POLICE DEPARTMENT TRAINING MANUAL
Bumpy notices the book.
His expression changes.
His hands begin trembling.
He quickly pushes them deeper into his pockets.
VOICE-OVER — BUMPY:
“He's holding a Detroit Police Department manual.”
Bumpy watches Williams carefully.
VOICE-OVER — BUMPY:
“An academy recruit looking to prove himself was the last thing I needed.”
Bumpy lowers his head and deliberately changes his posture, attempting to appear harmless.
He starts walking toward Williams.
CAMERA: Begin with Bumpy's POV of Williams and the DPD manual. Cut to a close-up of Bumpy's eyes. Slowly track backward as Bumpy approaches the checkpoint.
END SHOT: Bumpy arrives at Williams' counter.
Recommended Configuration
Cinematic Reasoning
Camera: Sony Venice 2
The description notes a "Smooth, filmic Sony cinema" texture. Its exceptional low-light dual-native ISO and rich color depth are perfect for capturing subtle shifts in facial expressions, such as Bumpy's trembling hands and changing posture.
Focal / Lens Type: 35mm / Standard or Macro
A 35mm lens provides a natural POV look for the terminal environment without distorting the space. For the script's specific instruction ("Cut to a close-up of Bumpy's eyes"), swapping to a Macro or using a tight 35mm proximity will hyper-focus on his anxiety.
Aperture(f/2.8)
A wide aperture like (f/2.8) creates a shallow depth of field. This allows you to selectively blur out the background terminal and isolate the critical story elements: Agent Williams, the blue DPD training manual, and Bumpy's trembling hands.
Frame Rate: 24 fps
The universal cinematic standard for narrative feature films. It maintains natural motion blur during the backward camera tracking shot.
Lighting Mood: Low-key dramatic
Essential for a suspense scene. This style utilizes high-contrast shadows to physically represent the danger of the checkpoint and the internal fear Bumpy is trying to suppress.
Color Palette: Desaturated cinematic or Muted earth tones
A Desaturated cinematic look drains vibrant colors from the terminal, heightening the clinical, cold, and unforgiving nature of a federal checkpoint. Alternatively, Muted earth tones will blend the tan-and-brown customs uniform seamlessly into a gritty aesthetic.
Genre: Thriller
The script is built entirely around suspense, fear of discovery, behavioral camouflage, and an underlying threat. It fits perfectly into the Thriller category.
SHOT 3 — IDENTIFICATION
SHOT PURPOSE: Create the first direct confrontation between Bumpy and Williams.
VISUAL:
Bumpy stands directly in front of Williams.
Williams continues looking at his digital terminal.
Bumpy's breathing is controlled but tense.
Williams finally speaks without looking up.
WILLIAMS:
“Your identification, sir?”
Bumpy hesitates.
Williams slowly looks up.
Bumpy removes his medical mask.
Williams studies him.
Bumpy forces himself to maintain eye contact.
His fear is visible, but he refuses to show panic.
BUMPY:
“My brother... I lost my driver's license three months ago in Ottawa. I don't have any ID on me.”
Bumpy pauses.
He swallows.
His voice becomes heavier and more emotional.
BUMPY:
“I just need to get home to my eleven-year-old son.”
Williams studies Bumpy's face.
Bumpy watches Williams.
Neither man speaks.
The ambient noise of the bus station seems to fade beneath the tension.
CAMERA: Tight close-up alternating between Williams' eyes and Bumpy's eyes.
END SHOT: Williams looking directly into Bumpy's eyes.
SHOT 4 — THE TATTOO
SHOT PURPOSE: This is the dramatic centerpiece of the scene—the moment Williams recognizes the tattoo and makes a consequential decision.
VISUAL:
Williams' eyes move downward.
Bumpy notices.
Suddenly, Bumpy reacts on instinct.
He pulls his left hand from his pocket.
He rolls the sleeve of his beige military sweater and white turtleneck upward.
He thrusts his left forearm onto the counter.
REVEAL: The tattoo.
The camera pushes into an extreme close-up.
Black cursive lettering against Bumpy's medium-brown skin:
AFRICAN AMERICAN
THE SPECIAL EDITION
Williams freezes.
He slowly leans forward.
His shadow falls across Bumpy's forearm.
Williams studies the tattoo.
The terminal noise continues around them, but the two men seem isolated from the rest of the world.
HOLD.
One second.
Two.
Three.
Four.
Five.
Williams finally speaks.
WILLIAMS:
“African American
The Special Edition?”
Bumpy doesn't blink.
Williams looks from the tattoo to Bumpy's face.
Bumpy looks directly into Williams' eyes.
A silent, high-stakes confrontation.
Williams makes his decision.
He reaches toward the terminal.
A quiet electronic click.
Beside the blue Detroit Police Department manual is a red EMERGENCY button.
Williams moves the manual slightly to the side, revealing the button.
He looks at Bumpy.
A beat.
Then—
WILLIAMS:
“Welcome home, sir. Move along.”
Bumpy slowly pulls his sleeve back down.
CAMERA:
Begin on Bumpy's left hand as he pulls it from his pocket.
Follow his movement as he rolls up his sleeve.
As the forearm lands on the counter, push into an extreme close-up of the tattoo.
Hold on the tattoo long enough for Williams—and the audience—to read it clearly.
Then slowly tilt upward from the tattoo to Williams' eyes.
Hold.
Continue upward to Bumpy's eyes.
Hold on the two men locked in eye contact.
IMPORTANT VISUAL CONTINUITY:
The tattoo must remain identical in design, placement, lettering, size, and appearance throughout the shot. The words “AFRICAN AMERICAN: THE SPECIAL EDITION” must remain legible and spelled exactly as written.
The beige military sweater, white turtleneck, Bumpy's medium-brown skin tone, and Williams' appearance must remain visually consistent throughout the shot.
END SHOT:
Bumpy's eyes meeting Williams' eyes.
CUT.
One additional SuperCool consideration: I would treat the tattoo as a locked reference element, almost like a character. Text generation is notoriously unreliable, so this is one of the elements I would protect with a reference image rather than trusting the model to recreate the lettering from the prompt alone.
SHOT 5 — THE DIRTY D
SHOT PURPOSE: End the sequence with a visual metaphor for Bumpy's return to Detroit—a man disappearing into the city while the darkness surrounding him grows.
VISUAL:
Bumpy pulls his sleeve completely down.
He puts his medical mask back on.
He turns away from Williams.
The sliding glass doors open.
Bumpy walks out of the Greyhound terminal.
CUT TO:
A low-angle close-up of Bumpy's black work boots stepping onto the cracked sidewalk outside.
DETROIT.
Cold pavement.
Gray sky.
Weathered urban buildings.
Traffic moving in the distance.
Bumpy keeps his head lowered.
He walks alone.
The camera remains low, following his boots as he moves down the sidewalk.
His shadow stretches across the cracked concrete behind him.
VOICE-OVER — BUMPY:
“I was back in the belly of the beast.”
BEAT.
“A shadow among the living.”
Bumpy continues walking.
The camera slowly pulls back.
With each step, Bumpy becomes smaller against the Detroit cityscape.
His shadow stretches farther across the pavement, gradually becoming a dominant visual element in the frame.
Bumpy disappears deeper into the city.
For a moment, his shadow remains visible against the pavement.
VOICE-OVER — BUMPY:
“And for now, my secret was still mine.”
BEAT.
“Hide out in God's shadow.”
The camera continues pulling farther away.
Detroit fills the frame.
Bumpy is now almost lost within the city.
FADE TO BLACK.
CAMERA:
Begin with a low-angle close-up of Bumpy's boots.
Track backward with him as he walks.
Gradually transition from the boots to a wider shot that reveals Bumpy against the Detroit cityscape.
Continue pulling away until Bumpy becomes a small figure within the environment.
The final composition should emphasize the contrast between one man and the enormous city around him.
TONE:
Cold.
Isolated.
Dangerous.
Foreboding.
The feeling should be that Bumpy has not simply returned to Detroit—he has returned to the world that nearly destroyed him.
IMPORTANT VISUAL CONTINUITY:
Bumpy's black work boots, clothing, medical mask, body proportions, skin tone, and overall appearance must remain consistent throughout the shot.
The Detroit environment should maintain the same cold, gray, early-morning atmosphere established in the preceding shots.
END SHOT:
Bumpy disappears into Detroit.
FADE TO BLACK.
END OF SEQUENCE
VISUAL STORY ARC
SHOT 1: Bumpy arrives.
SHOT 2: Bumpy discovers danger.
SHOT 3: Bumpy is confronted.
SHOT 4: The tattoo saves him.
SHOT 5: Bumpy enters Detroit—and his past follows him.
KEY VISUAL ELEMENTS TO KEEP CONSISTENT
Marc “Bumpy” Dominique — 32 years old
6'1", approximately 170 pounds
Gaunt, exhausted appearance
Medium-brown skin
Deep dark circles beneath the eyes
Beige military-style sweater with brown shoulder patches
White turtleneck
Dark blue jeans
Rugged black work boots
Medical mask
Black military-style watch
Left forearm tattoo: “African American: The Special Edition”
Agent Williams — young, tall Black man, clean-faded hair
Tan-and-brown customs uniform
Blue Detroit Police Department Manual
Cold March Detroit
Gray, overcast atmosphere
Wet pavement
Bumpy's frightened but controlled behavior
Tattoo as the dramatic turning point
Bumpy's enormous shadow as the closing visual metaphor
SUPERCOOL PRODUCTION NOTE
Do not generate all five shots as one clip.
Build the sequence shot by shot.
The most important shot to protect is SHOT 4 — THE TATTOO.
The most important visual ending is SHOT 5 — THE SHADOW.
These two shots carry the identity of the entire opening sequence.
